Refresh Power BI Datasets with ADF or Synapse (MSI)
Case
I want to refresh my Power BI Dataset as soon as my ETL process has finished. I don’t want to schedule my dataset refresh x minutes/hours after my ADF(/Synapse) pipeline schedule because then I’m either refreshing too soon or waiting unnecessarily long to start the refresh. How can I minimize the time between the end of my ETL proces and the start of my dataset refresh?
Solution
In the previous blog post we showed you how to use the Rest APIs from Power BI to refresh a dataset from within your ADF(/Synapse) pipeline. For that example we used an Azure Active Directory Service Principal (SP), but there is also an option to use the Managed (Service) Identity (MSI) from ADF(/Synapse).
Using the MSI not only saves you creating a SP (and storing/recycling its secret), but the pipeline also uses less activities which makes it more readable. However you probably still need some help from a Domain Administrator and/or an Office 365 Administrator, because:
- You need to create an Azure Active Directory Group and add the MSI of your ADF or Synapse to it.
- After that you need to use that AAD Group within the Tenant Settings of Power BI.
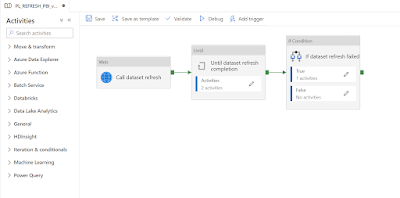
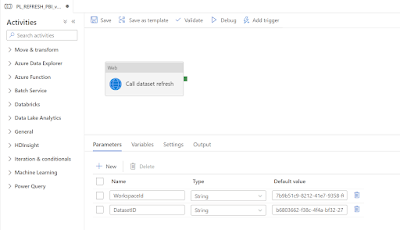
The basic version of the pipeline looks like this. The more complex version could for example retrieve the required workspace id and dataset id by its name via additional Rest API calls to Power BI. More on that in the conclusions.
|
|
| Basic pipeline to refresh a PBI dataset |
Now below all the steps to create this pipeline that can refresh your Power BI datasets. There are a lot of steps, but don’t let that scare you. It seems way more difficult then it really is.
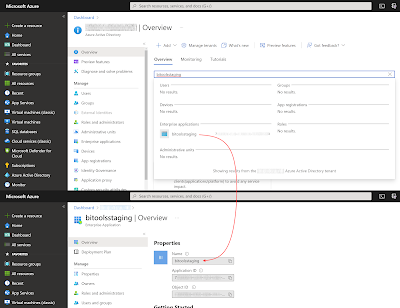
1) Finding the MSI of your ADF/Synapse workspace
For this example we will give the Managed (Service) Identity of your ADF or Synapse workspace access to Power BI, but how can you find this MSI? They can be found in the Azure Active Directory (AAD) as an EnterPrise Application. This means you can authorize it for services like Power BI just like a regular user from the AAD. The EnterPrise Application has a name (equals to the name of your ADF or Synapse workspace), an object id (a guid) and an application id (also a guid).
|
|
| Find your ADF (or Synapse workspace) in the AAD |
The Name is the one you need and the Application ID is the one you can use to double check that you have the correct item from the AAD. ADF also shows the Application ID on its Properties page as Managed Identity Application ID. However Synapse only shows the Managed Identity object ID which is useless in this case.
2) Allow MSI to use Power BI APIs
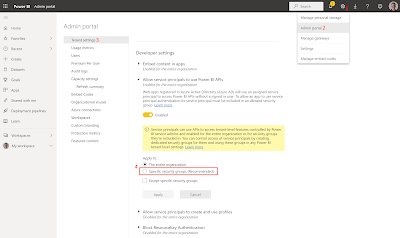
For this first real step you need access to the Power BI admin portal to give the MSI of ADF(/Synapse) access to the Rest APIs from Power BI.
- Log in to Power BI online and click on the gear icon in the upper right corner
- Click on Admin portal in the menu to open the portal
- Then click on Tenant settings (if you don’t see this, continue after the next image)
- Scroll down to the Developer settings and locate ‘Allow service principal to use Power BI APIs’
Either allow the entire organization to use the Rest APIs (not recommended) or specify an Azure Active Directory Group and make sure your MSI is a member of that group (this is where you probably need some help from the Domain Administrator.
|
|
| PBI Admin portal – Tenant Settings |
If you couldn’t find the tenant settings in the Admin Portal from Power BI then you need an Power BI administrator role. Your Office 365 administrator can either give you the role or do the steps above for you. If you are able get this role then you should probably consider using Azure AD Privileged Identity Management (PIM) to first get approval from a colleage to temporarily get this role and also use the PBI audit log to record all logins to the admin portal and record all changes in the tenant settings.
3) Give permissions in Power BI Workspace
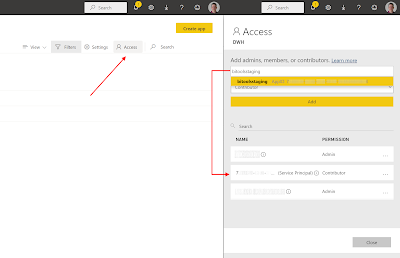
Next step is to give your MSI contributor rights in the PBI Workspace that contains the dataset that you want to refresh.
- Go to your Power BI workspace and click on Access in the upper right corner
- Search for your Service Principal by its name (ours is called PowerBI)
- Select the right permission (contributor) and click on the Add button
- Verify the changed list of permissions and then click on the Close button
|
|
| Give MSI permissions in your workspace |
4) Refresh Dataset
Now go to your pipeline in ADF (or Synapse). For refreshing a dataset we need both the workspace and the dataset ID from Power BI. We will store these IDs in two Pipeline parameter so that you can use the pipeline to refresh different datasets. In a later post we will show how to use the names instead of the IDs.
|
|
| Pipeline parameters for Workspace ID and Dataset ID |
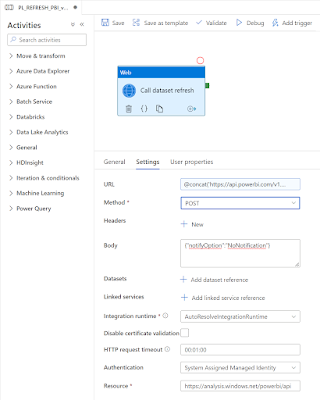
The refresh command will be given via a Web activity that executes the
Refresh Dataset In Group Rest API from Power BI. The refresh call is asynchronous, so it does not wait for the refresh to finish.
- Add a Web Activity and give it useful name.
- The URL uses the two IDs stored in the two pipeline parameters above. Use an expression like this to build the URL (check the parameters names):
@concat(
‘https://api.powerbi.com/v1.0/myorg/groups/’
, pipeline().parameters.WorkspaceGuid
, ‘/datasets/’
, pipeline().parameters.DatasetGuid
, ‘/refreshes’
)
- Set Method to Post
- The Body can be used to set certain options like no notifications. See the documentation for more options. Enter the following JSON in the body:
{“notifyOption”:”NoNotification”}
- Set Authentication to System Assigned Managed Identity
- Set Resource to https://analysis.windows.net/powerbi/api
|
|
| Refresh a Power BI dataset via Rest API |
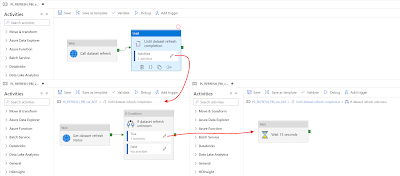
5) Check refresh status
The last steps are optionally, but if you want to be sure your dataset has been successfully refreshed we need to check the dataset refresh status in a loop. For this task the UNTIL loop is the best option. Within the loop we have a Web Activity to check the status and an Wait activity (within an If condition) to wait a couple of minutes/seconds because you don’t want to check the status each second.
|
|
| The check status construction |
A slightly simpler option would be to just put a Wait Activity before the Web Activity instead of the If construction after the Web Activity.
Now all the individual steps and their screentshot:
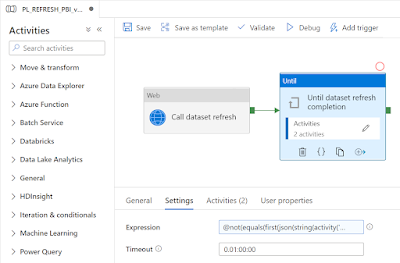
- Add an Until and give it a suitable name
- The Expression continues the loop until the status is not equals ‘Unknown’ :
@not(
equals(
first(
json(
string(
activity(‘Get dataset refresh status’).output
)
).value
).status,’Unknown’
)
)
Note the name of the activity that will be inside the Until loop (if it is not yet there, it will give an error)
- Consider changing the default 7 day timeout to the expected max refresh duration with an extra couple of minutes to be sure
- Add a Web Activity within the Until loop and name it ‘Get dataset refresh status’. If you change that name, then you have to change it in all the expressions from the next steps.
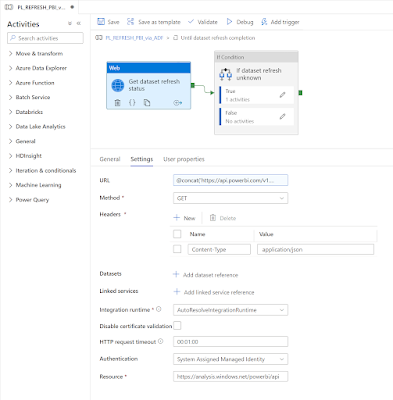
- The URL is simular to the Refresh dataset, but it uses a different action ‘refreshes‘ and a top 1 to only get the latest status:
@concat(
‘https://api.powerbi.com/v1.0/myorg/groups/’
,pipeline().parameters.WorkspaceGuid
,’/datasets/’,pipeline().parameters.DatasetGuid
,’/refreshes?$top=1′
)
- Set Method to Get
- Add a header with the name ‘Content-Type’ and the value ‘application/json’
- Set Authentication to System Assigned Managed Identity
- Set Resource to https://analysis.windows.net/powerbi/api
|
|
| Web Activity to get the refresh status |
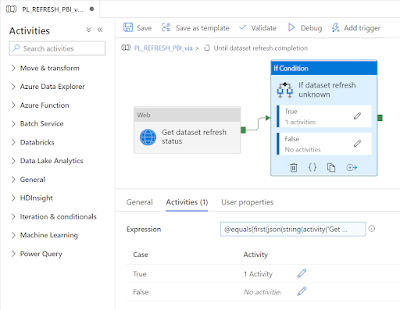
- Add an If Condition after the Web activity
- The expression checks whether the Web Activity still returns ‘Unknown’ as status (same expression as the Until loop):
@equals(
first(
json(
string(
activity(‘Get dataset refresh status’).output
)
).value
).status,’Unknown’
)
|
|
| Check status value with IF |
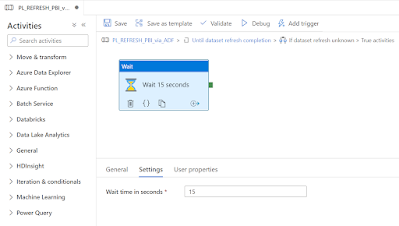
- Last step is to add a Wait Activity in the True condition.
- Choose a smart number of seconds. Too low and you will get a lot of unnecessary checks. Too high and you will get an unnecessary long turnaround time.
6) Fail pipeline if refresh failed
If the dataset refresh in Power BI fails then the Web Activity will show you the status, but it won’t fail the pipeline. The Until loop ends when the status changes. So by adding an additional If Condition that checks whether the refresh status is failed, allows you to use the
Fail activity to fail the pipeline.
- Add a If Condition after the Until loop
- The expression is simulair to the If Condition within the loop. Just a different status:
@equals(
first(
json(
string(
activity(‘Get dataset refresh status’).output
)
).value
).status,’Failed’
)
- Within the True condition add the Fail activity
- You can either enter a default fail message or try to get the error from the Web Activity with an expression like this:
@string(
json(
first(
json(
string(
activity(‘Get dataset refresh status’).output
)
).value
).serviceExceptionJson
)
)
- Last task is to pick an error code. This will show up in the logs.
|
|
| Fail pipeline if refresh fails |
Conclusion
In this post you learned how to refresh a Power BI dataset from within your ETL pipelines. Hopefully you weren’t scared of due all those steps. In a
next blog post we will show you how to use the workspace name and data set name instead of their IDs because that is much more user friendly and even a little safer because when you delete a dataset and publish it again it will get a different ID. This will need three additional tasks for the translation part.
Another extension that we will show in yet an other blog post is how to refresh only certain tables within that dataset. This will cause some changes to the Body of the refresh call, but also an additional Tenant setting change and… Power BI Premium.
thx to
Simon Zeinstra for suggesting the simpler version en helping out with the resource url